


In academia (as well as any other aspect of life, to be honest) credibility is key. And nothing screams credibility like well-placed citations in a Word document. Whether you’re a student or a researcher, ‘being on good terms’ with inserting citations in Microsoft Word can significantly level up the quality of your work. This article will guide you through the process, so that your documents follow the required citation style and format, making your work not only credible but also professional.

✅ AI Essay Writer ✅ AI Detector ✅ Plagchecker ✅ Paraphraser
✅ Summarizer ✅ Citation Generator
Creating and Inserting Citation in Microsoft Word
You may think that Word is something from the past. However, Microsoft Word provides a convenient feature for creating and inserting citations directly into your document. By following a series of simple steps, you can easily add citations in the appropriate format and style, so let’s break them down one by one.
1. Place Your Cursor
Begin by positioning your cursor at the exact location in your document where you want to insert the citation. This is typically at the end of a sentence or a quote where you need to acknowledge the source of the information.
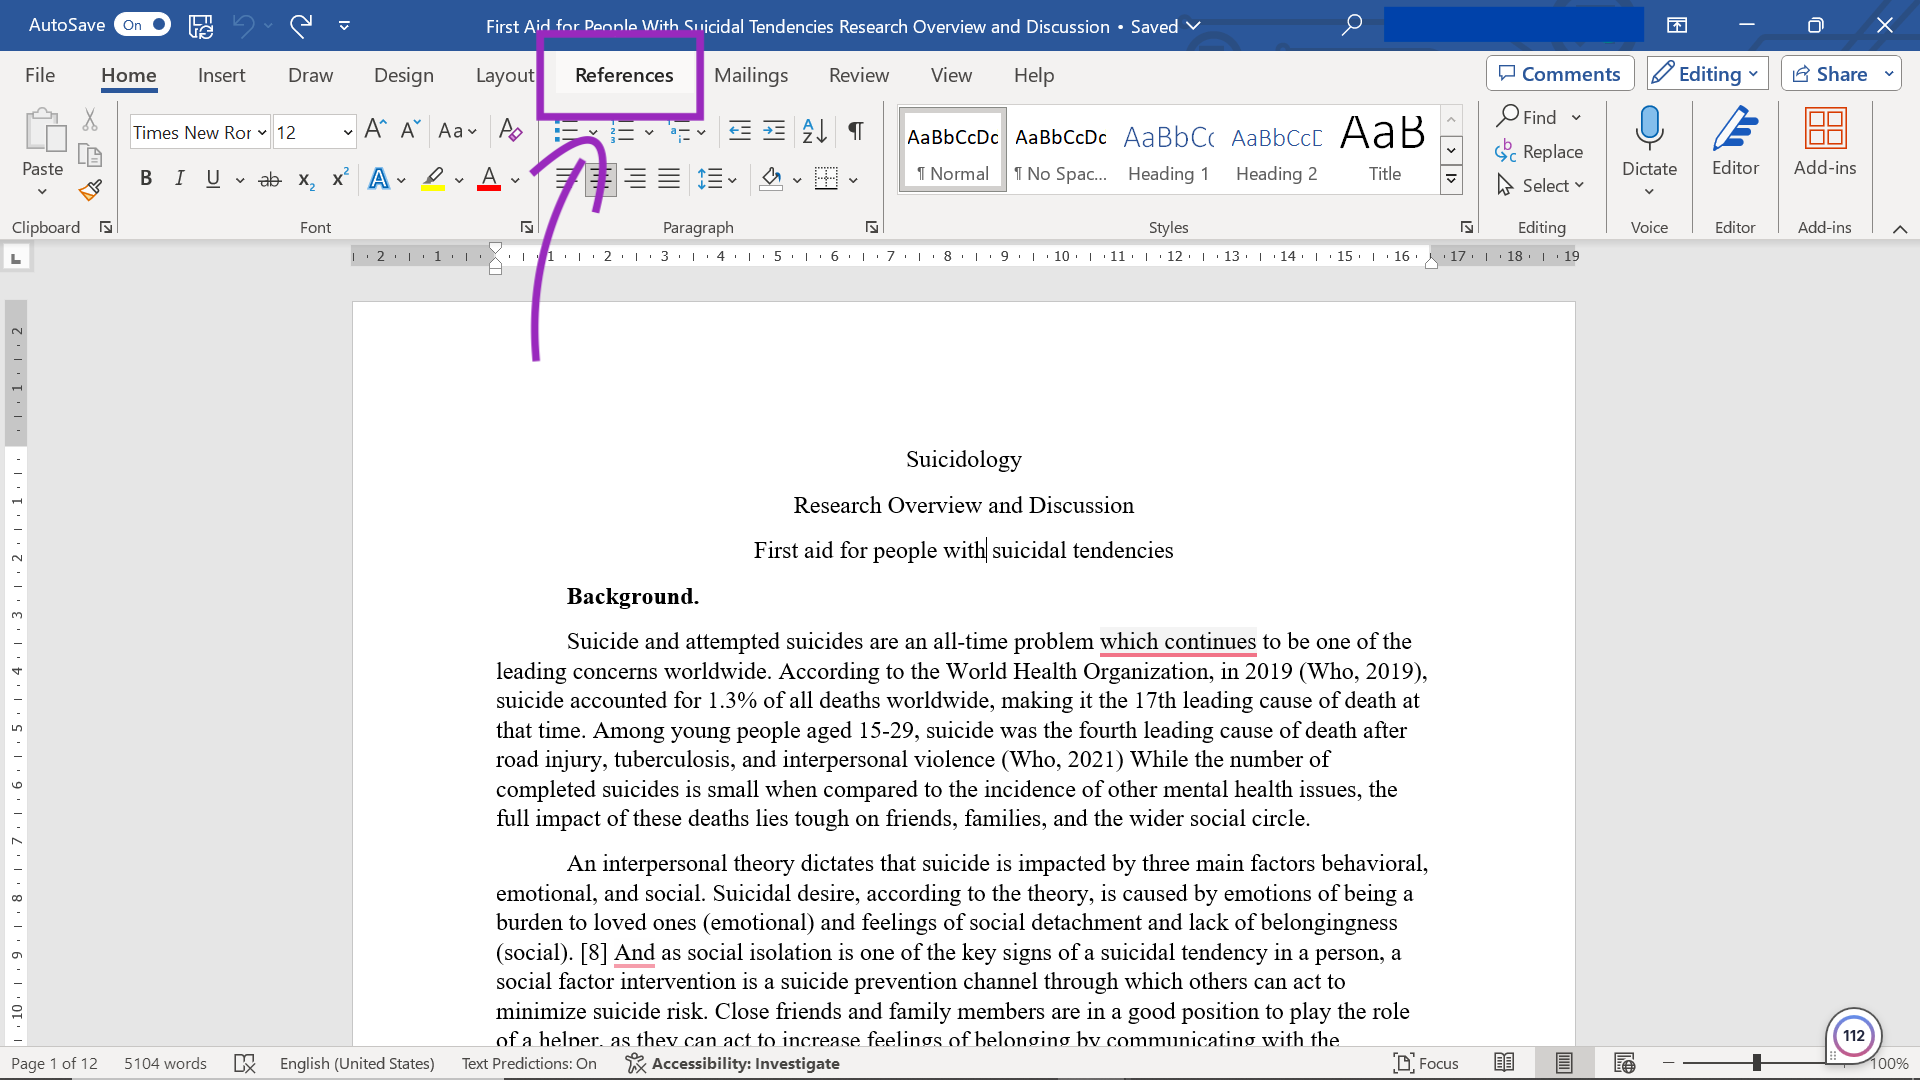
2. Access the References Tab
Go to the “References” tab on the ribbon at the top of the Word interface. This tab contains tools for managing citations, bibliographies, and other reference-related elements in your document.
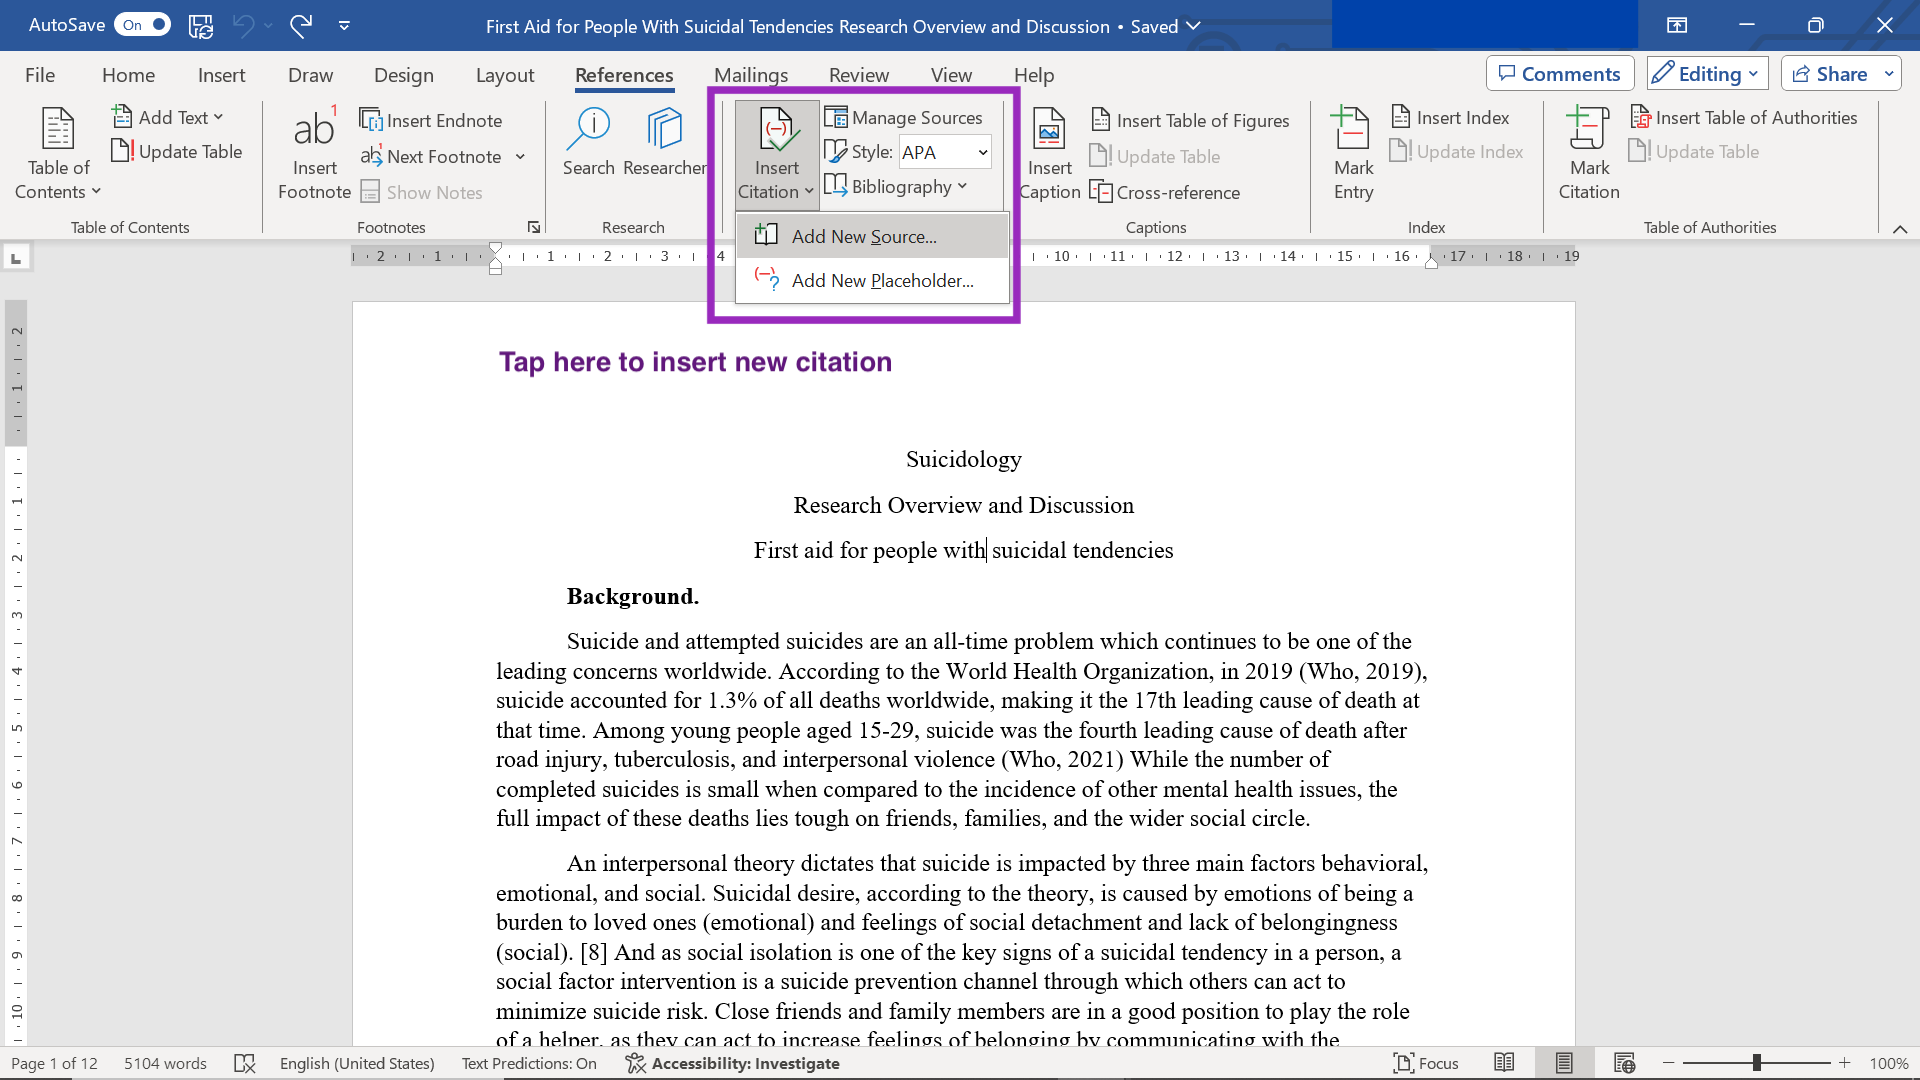
3. Insert Citation
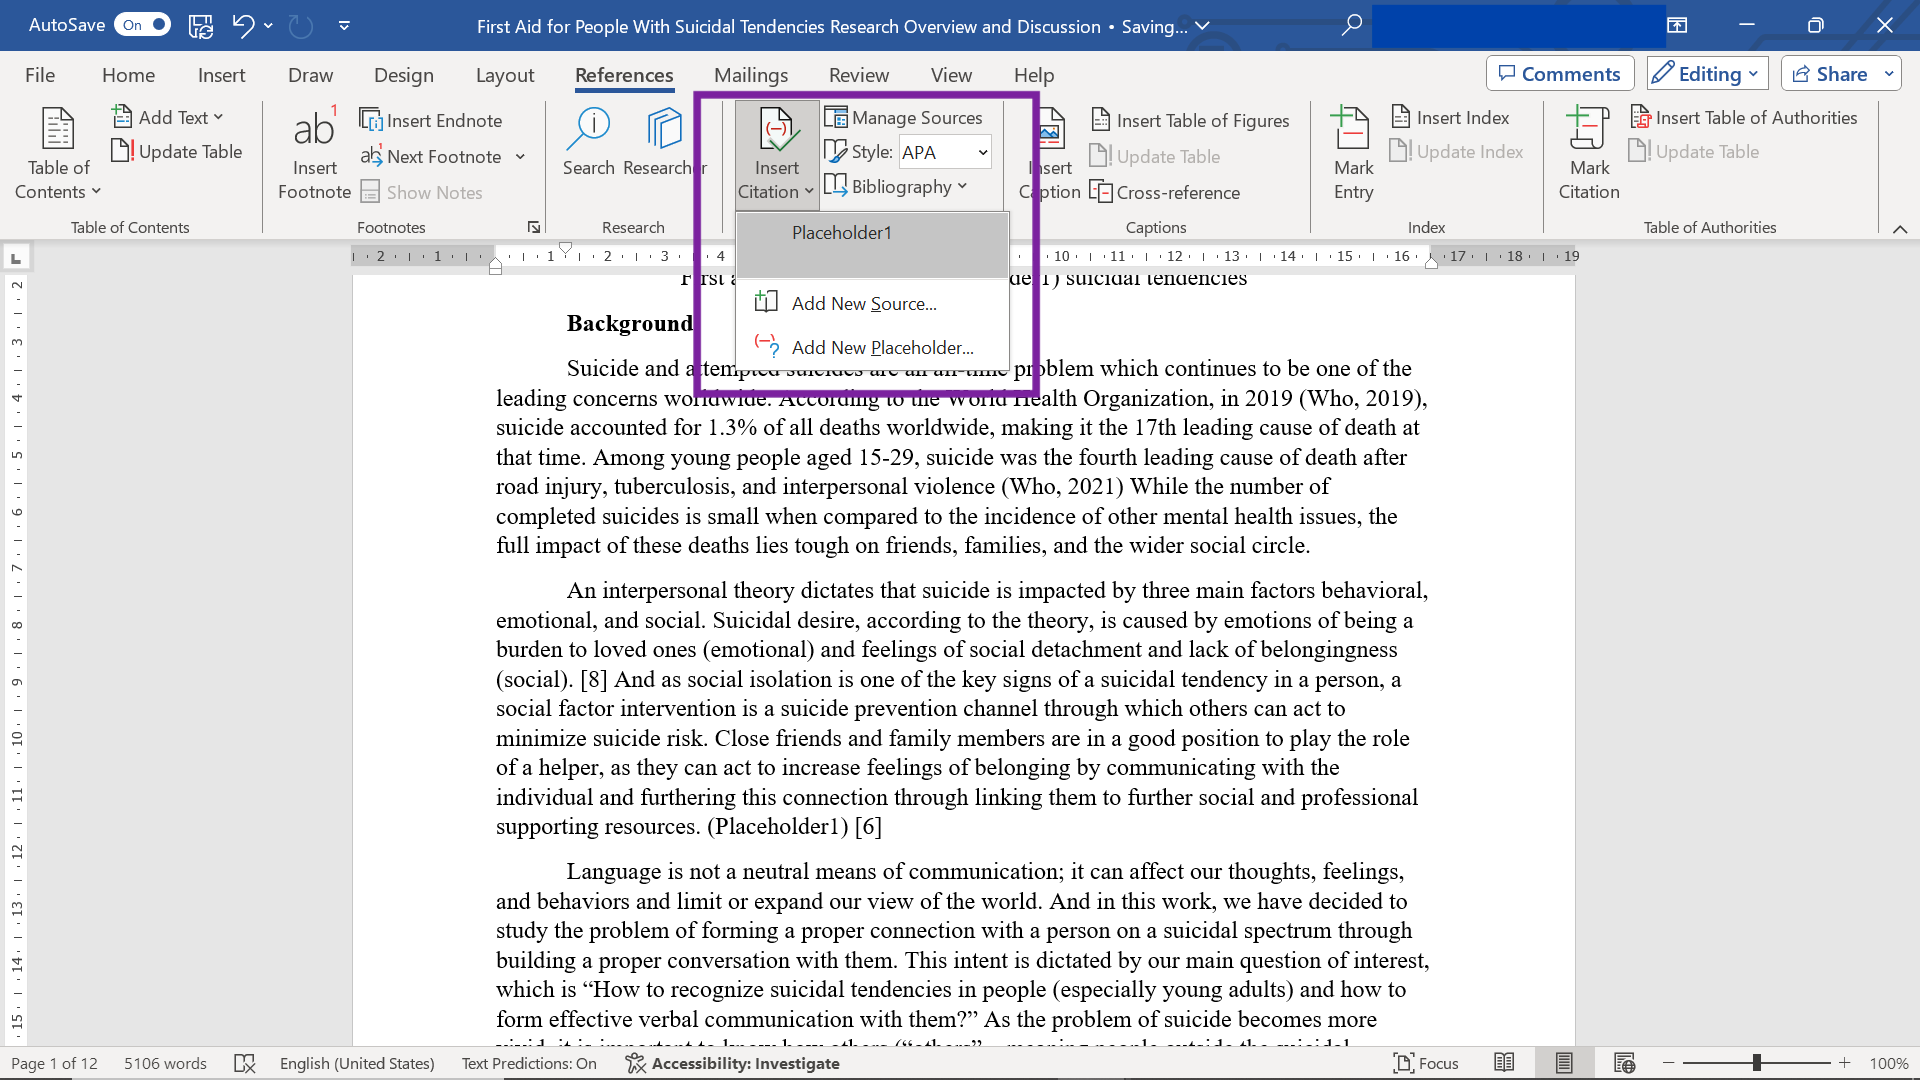
Within the “References” tab, find the “Citations & Bibliography” group. Click on the “Insert Citation” button. This action will prompt a drop-down menu offering options for adding a new source or selecting an existing one.
4. Add New Source
If you’re citing a new source, select “Add New Source” from the menu. This will open the “Create Source” dialog box, where you can enter the details of your source.
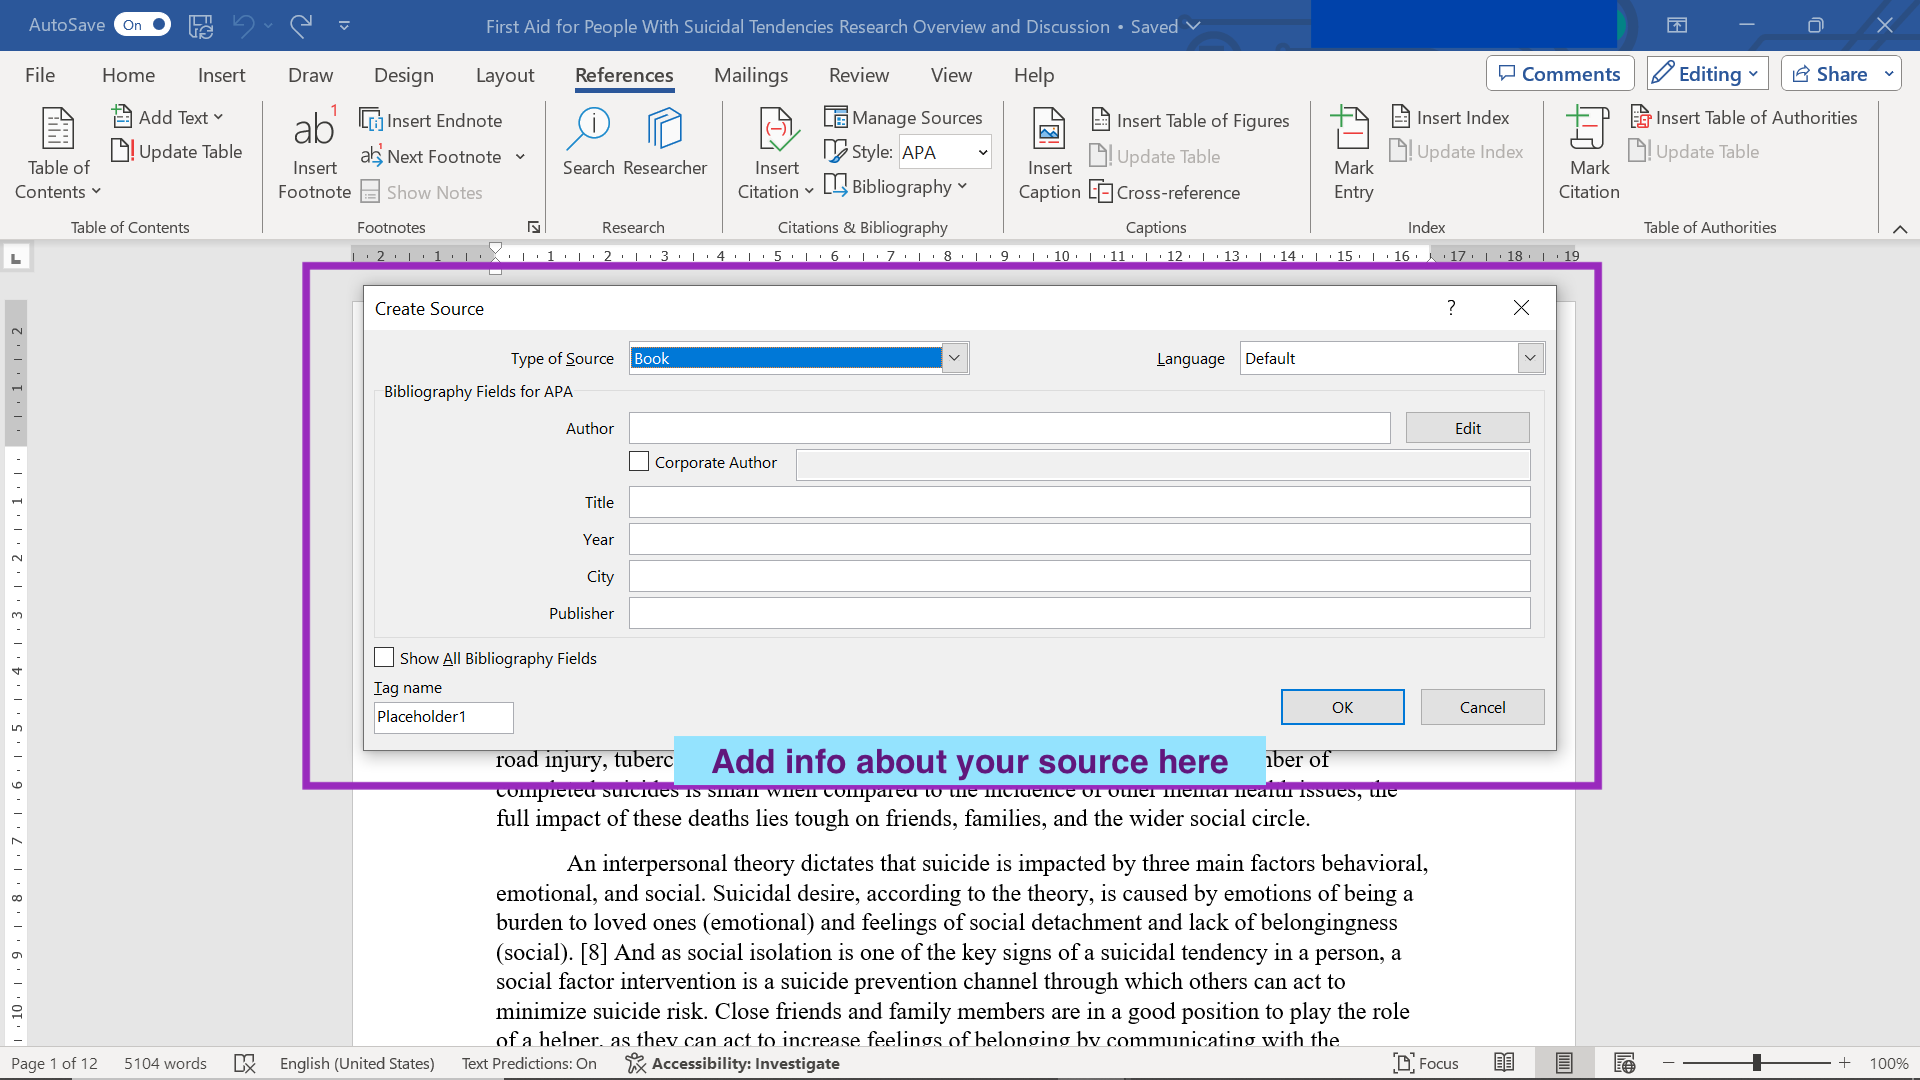
5. Select Source Type
In the “Create Source” dialog box, you’ll find a drop-down menu for choosing the type of source you’re citing (e.g., book, journal article, website, etc.). Select the appropriate category that best describes your source material.
6. Enter Source Details
After selecting the source type, fill in the relevant fields with the information about your source. Common fields include the author’s name, the title of the work, the publication year, and other pertinent details. Ensure that all the information is accurate and complete.
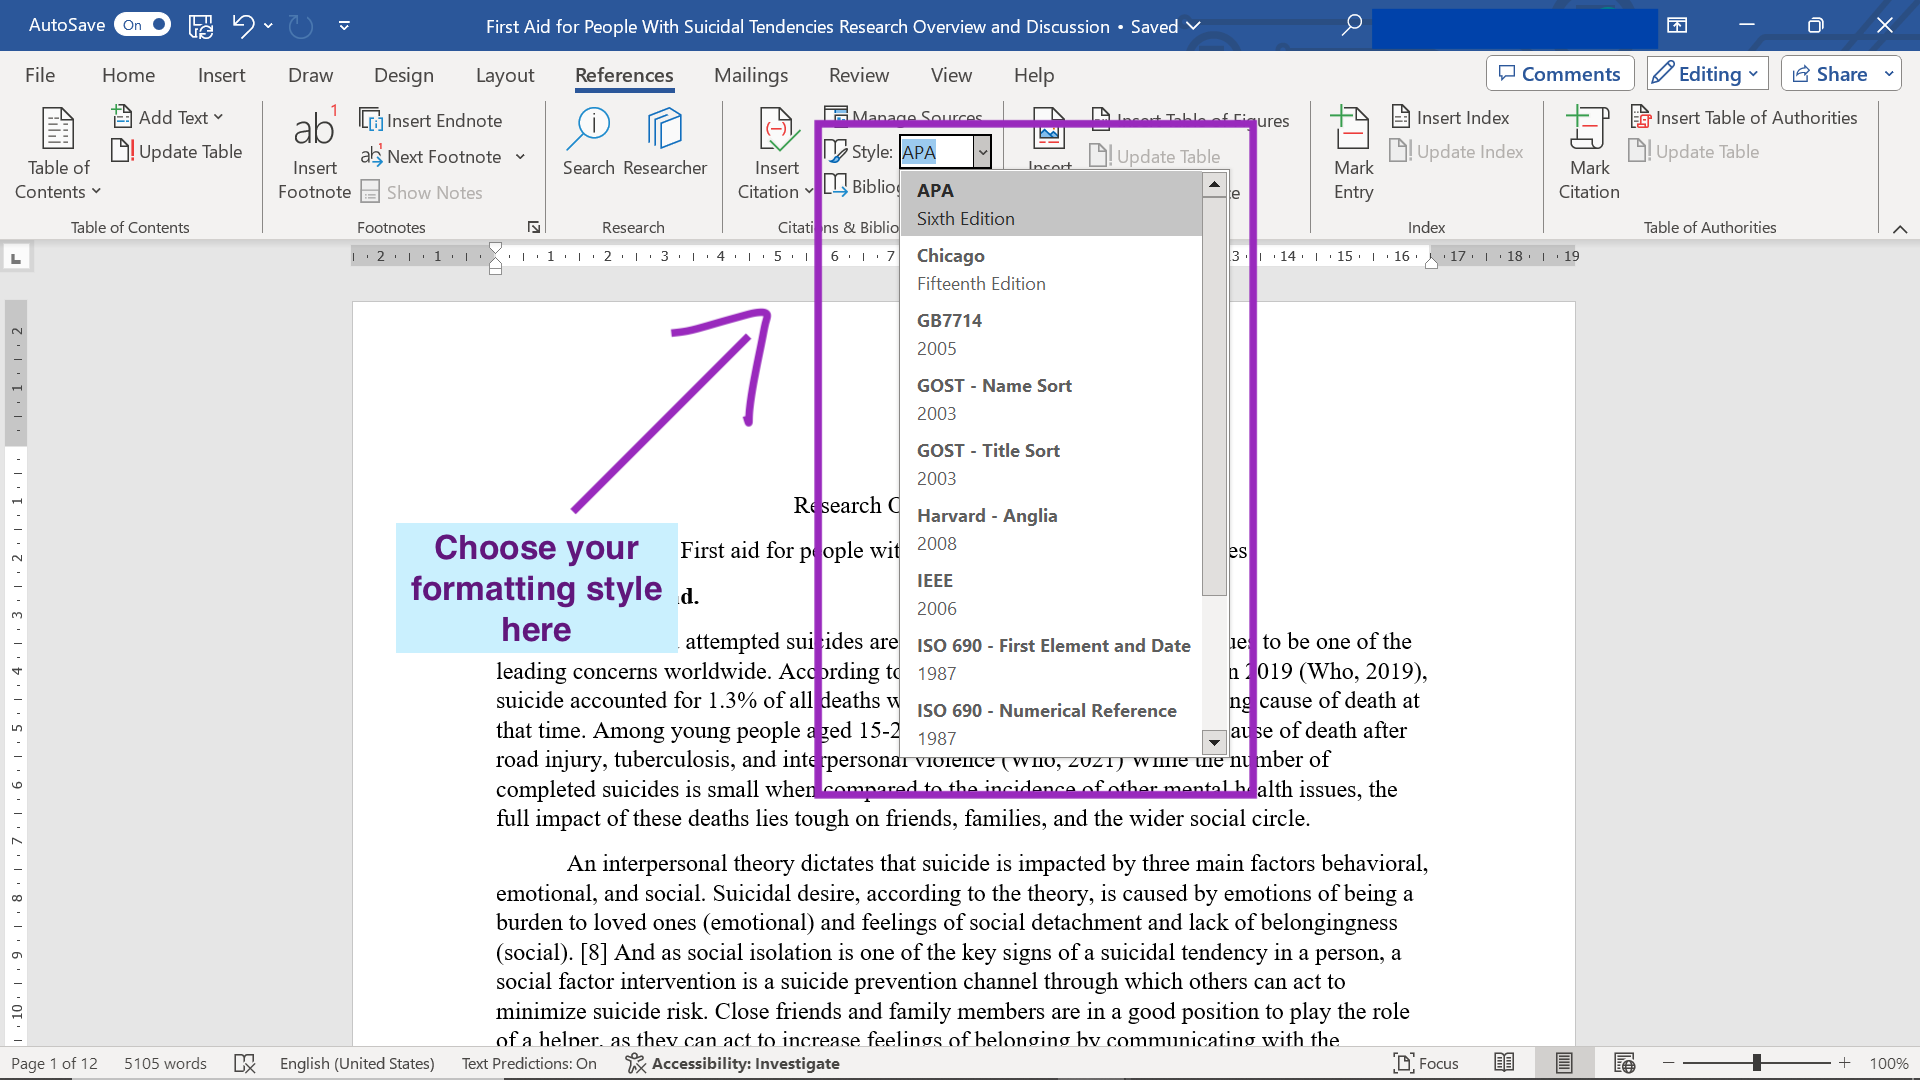
7. Insert the Citation
Once you’ve entered all the necessary information, click the “OK” button at the bottom of the dialog box. Word will automatically format the citation according to the selected style (e.g., APA, MLA, Chicago) and insert it into your document at the position of your cursor.
See? There’s nothing impossible in this, you just have to know where to find it. By following these steps, you can easily create and insert citations into your Word document, so that your work follows the required academic or professional standards for citing sources.
Adding Existing Citations
If you’ve already added citations to your document, you can insert them elsewhere in the text with no sweat:
1. Go to the “References” tab on the ribbon.
2. In the “Citations & Bibliography” group, click on “Insert Citation.”
3. After that choose the Choose the relevant citation from the list of sources that appears.
Making Bibliography
Creating a bibliography in Microsoft Word is an easy process that can save you a significant amount of time and ensure that your references are consistently formatted. If you are not sure if you know how to do that properly, you can use a free citation generator. But if you want to figure it out for yourself, here’s a detailed explanation of the process:
- Determine the Placement: Decide where you want your bibliography to appear in your document. Typically, a bibliography is placed at the end of a document, but you can insert it wherever it’s most appropriate for your work. Click in the document at the location where you want the bibliography to be inserted.
- Access the References Tab: Navigate to the “References” tab on the ribbon. This tab contains all the tools necessary for managing citations, bibliographies, and other reference-related elements in your document.
- Insert a Bibliography
In the “Citations & Bibliography” group, you’ll find the “Bibliography” button. Click on this button to reveal a gallery of pre-formatted bibliography styles, each with different titles and formatting options. These styles are designed to adhere to common citation formats such as APA, MLA, or Chicago.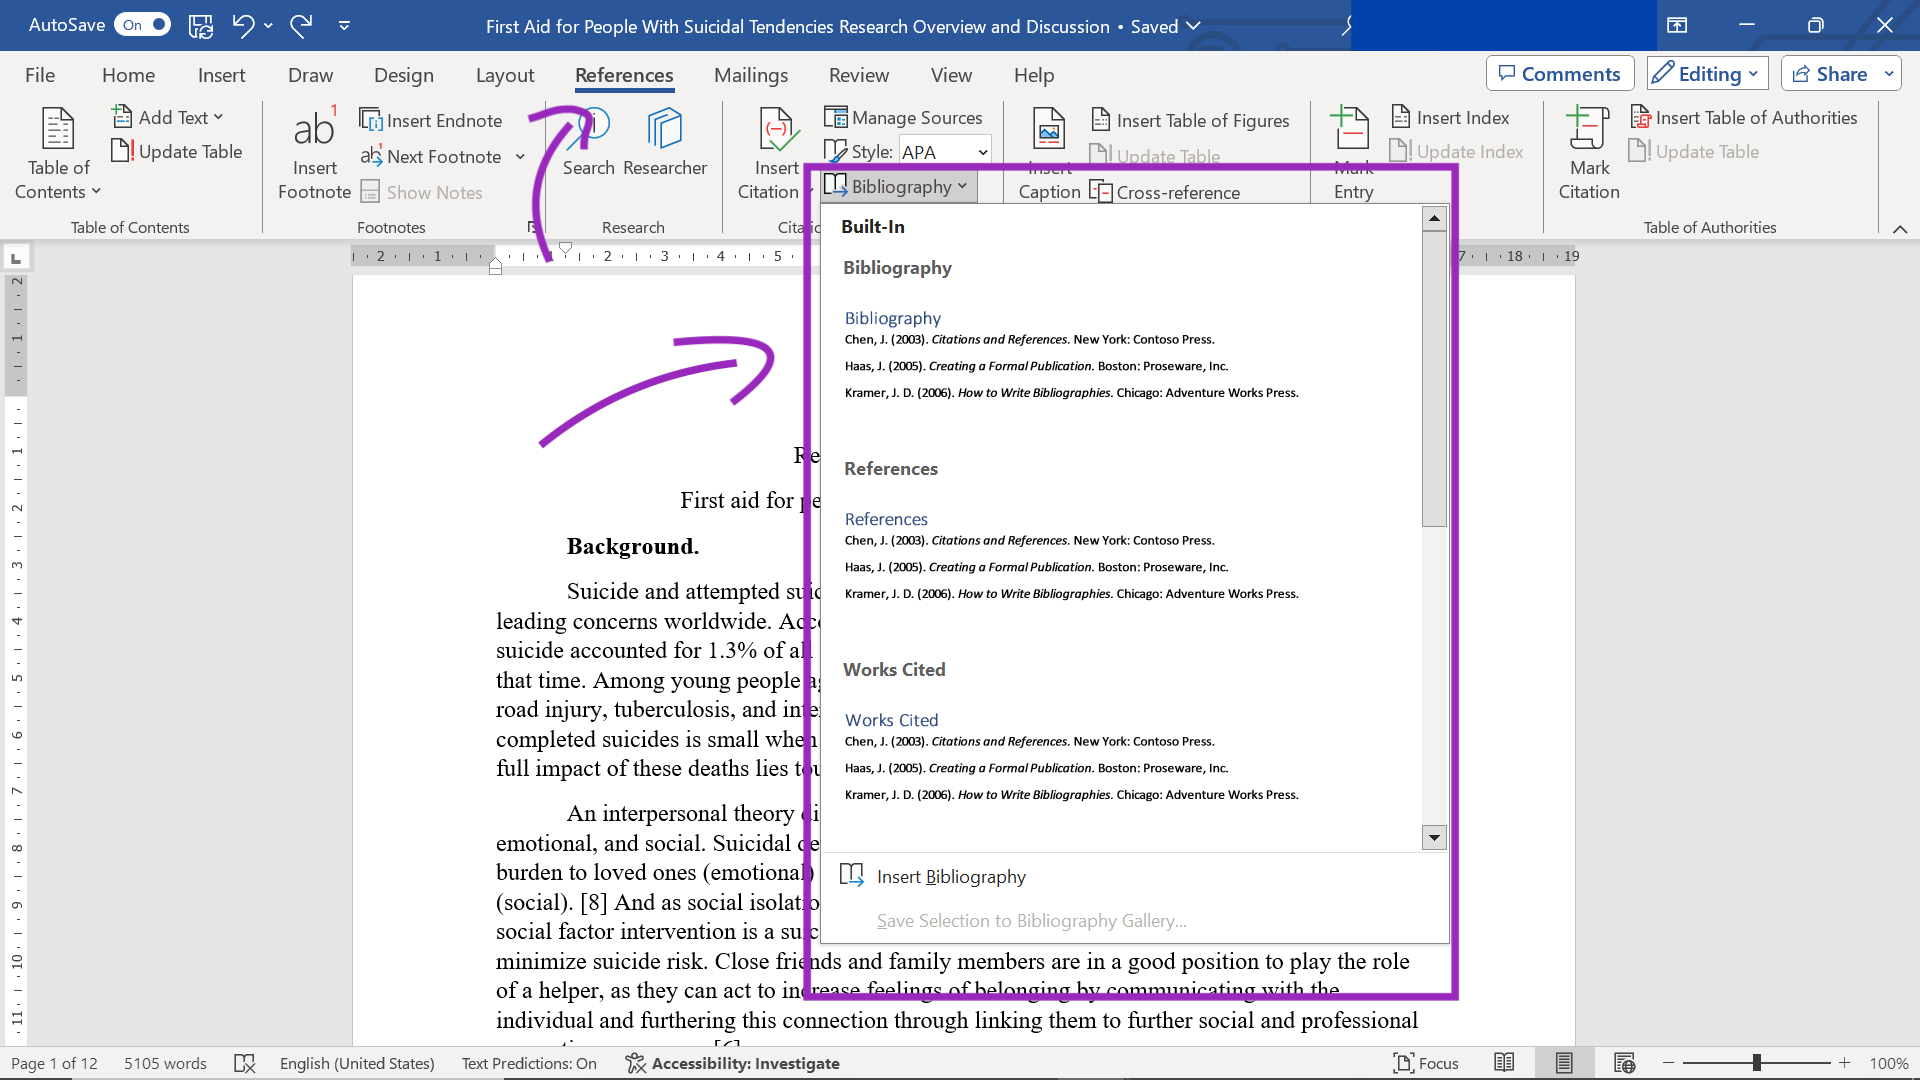
- Choose a Bibliography Style
Select a bibliography option from the gallery that best suits your needs. If you have specific requirements or prefer a custom format, you can choose “Insert Bibliography” to create your own style. - Automatic Generation: Once you’ve selected a style, Word will automatically generate a bibliography based on the sources you’ve cited throughout your document. It will compile all the references, format them according to the chosen style, and insert them into the designated location in your document.
- Review and Edit: After the bibliography is created, it’s important to review it for accuracy and completeness. You can edit individual entries if necessary by clicking on a citation within the bibliography and making the desired changes.
Finding a Specific Source
When working on academic projects or research papers, students often need to manage a wide range of sources. Microsoft Word provides a convenient feature for quickly finding and managing these sources through its “Source Manager.” Here’s how students can make the most of this feature:
1. Access the References Tab
Start by navigating to the “References” tab on the ribbon in your Word document. This tab contains all the tools necessary for managing citations and sources.
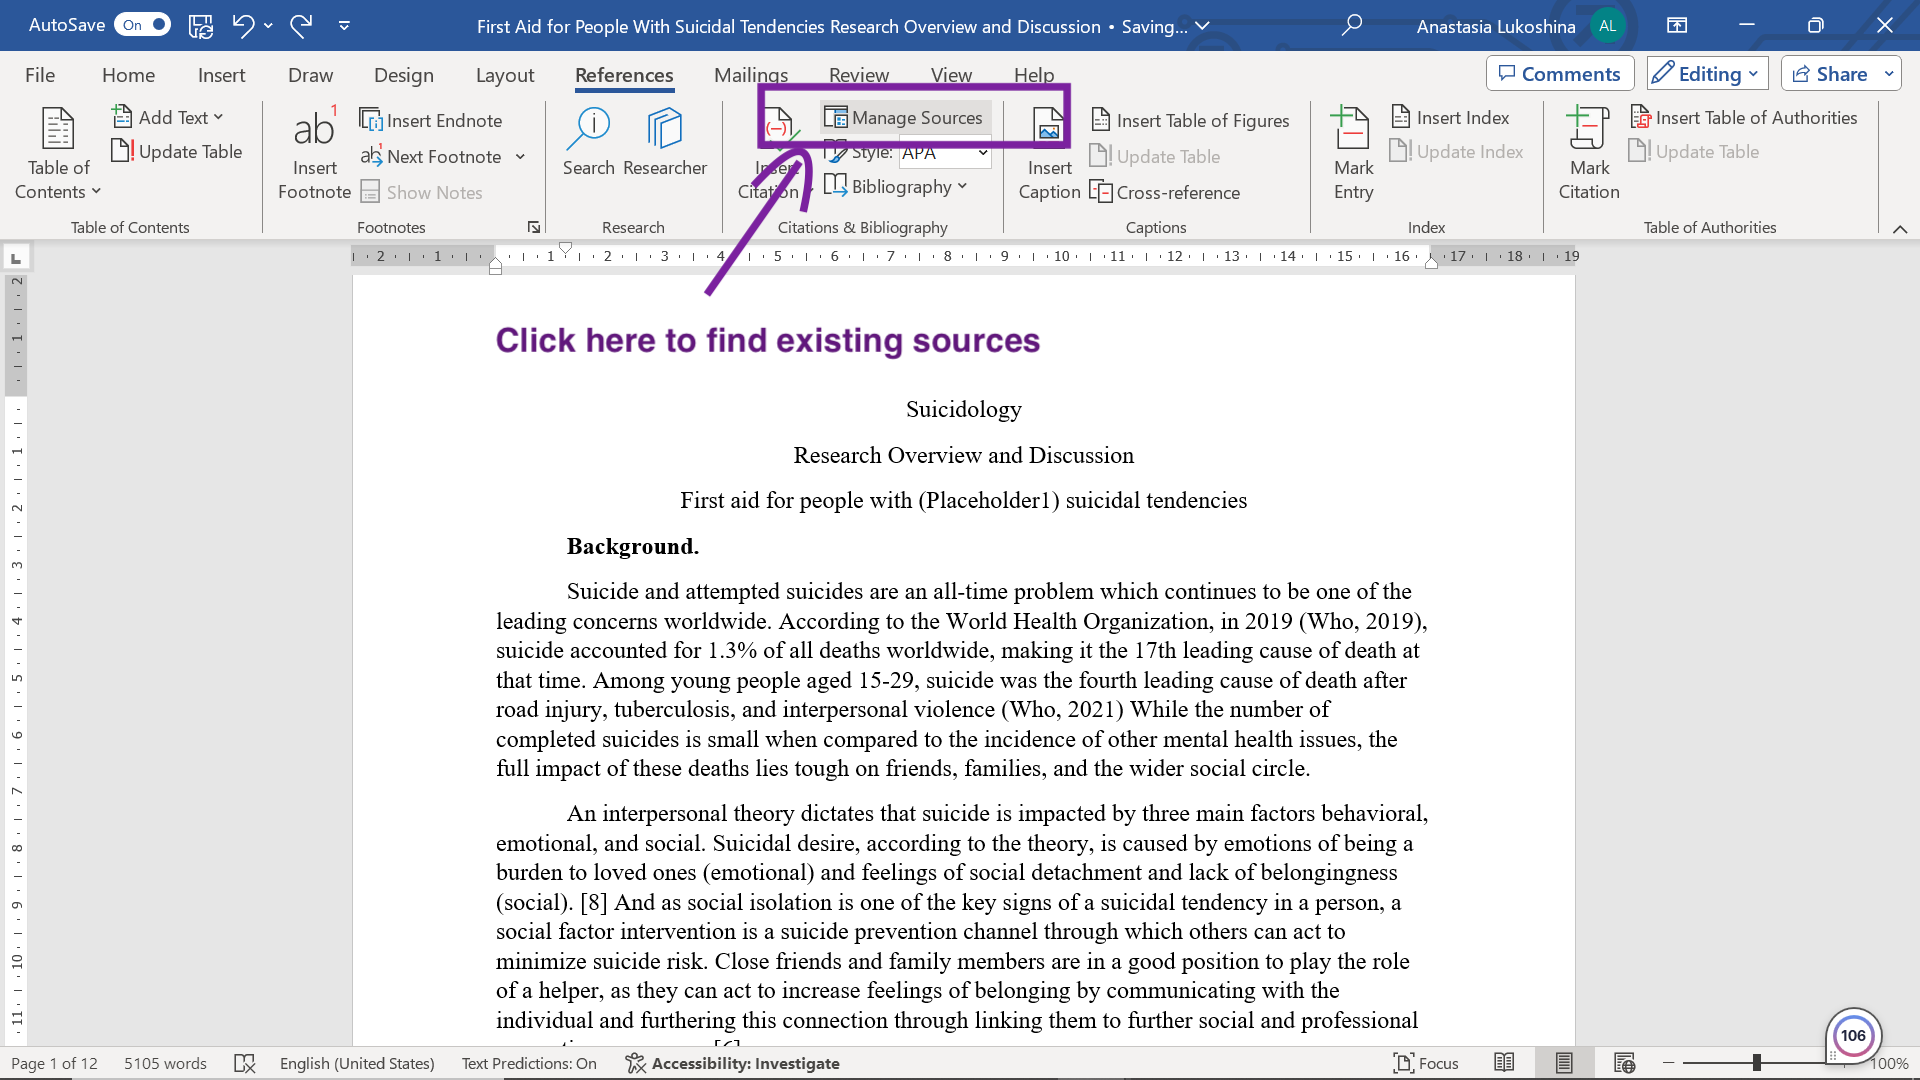
2. Open Manage Sources
Within the “References” tab, locate the “Citations & Bibliography” group. Click on “Manage Sources” to open the “Source Manager” dialog box. This is where all your sources are listed and can be managed.
3. Viewing Your Sources
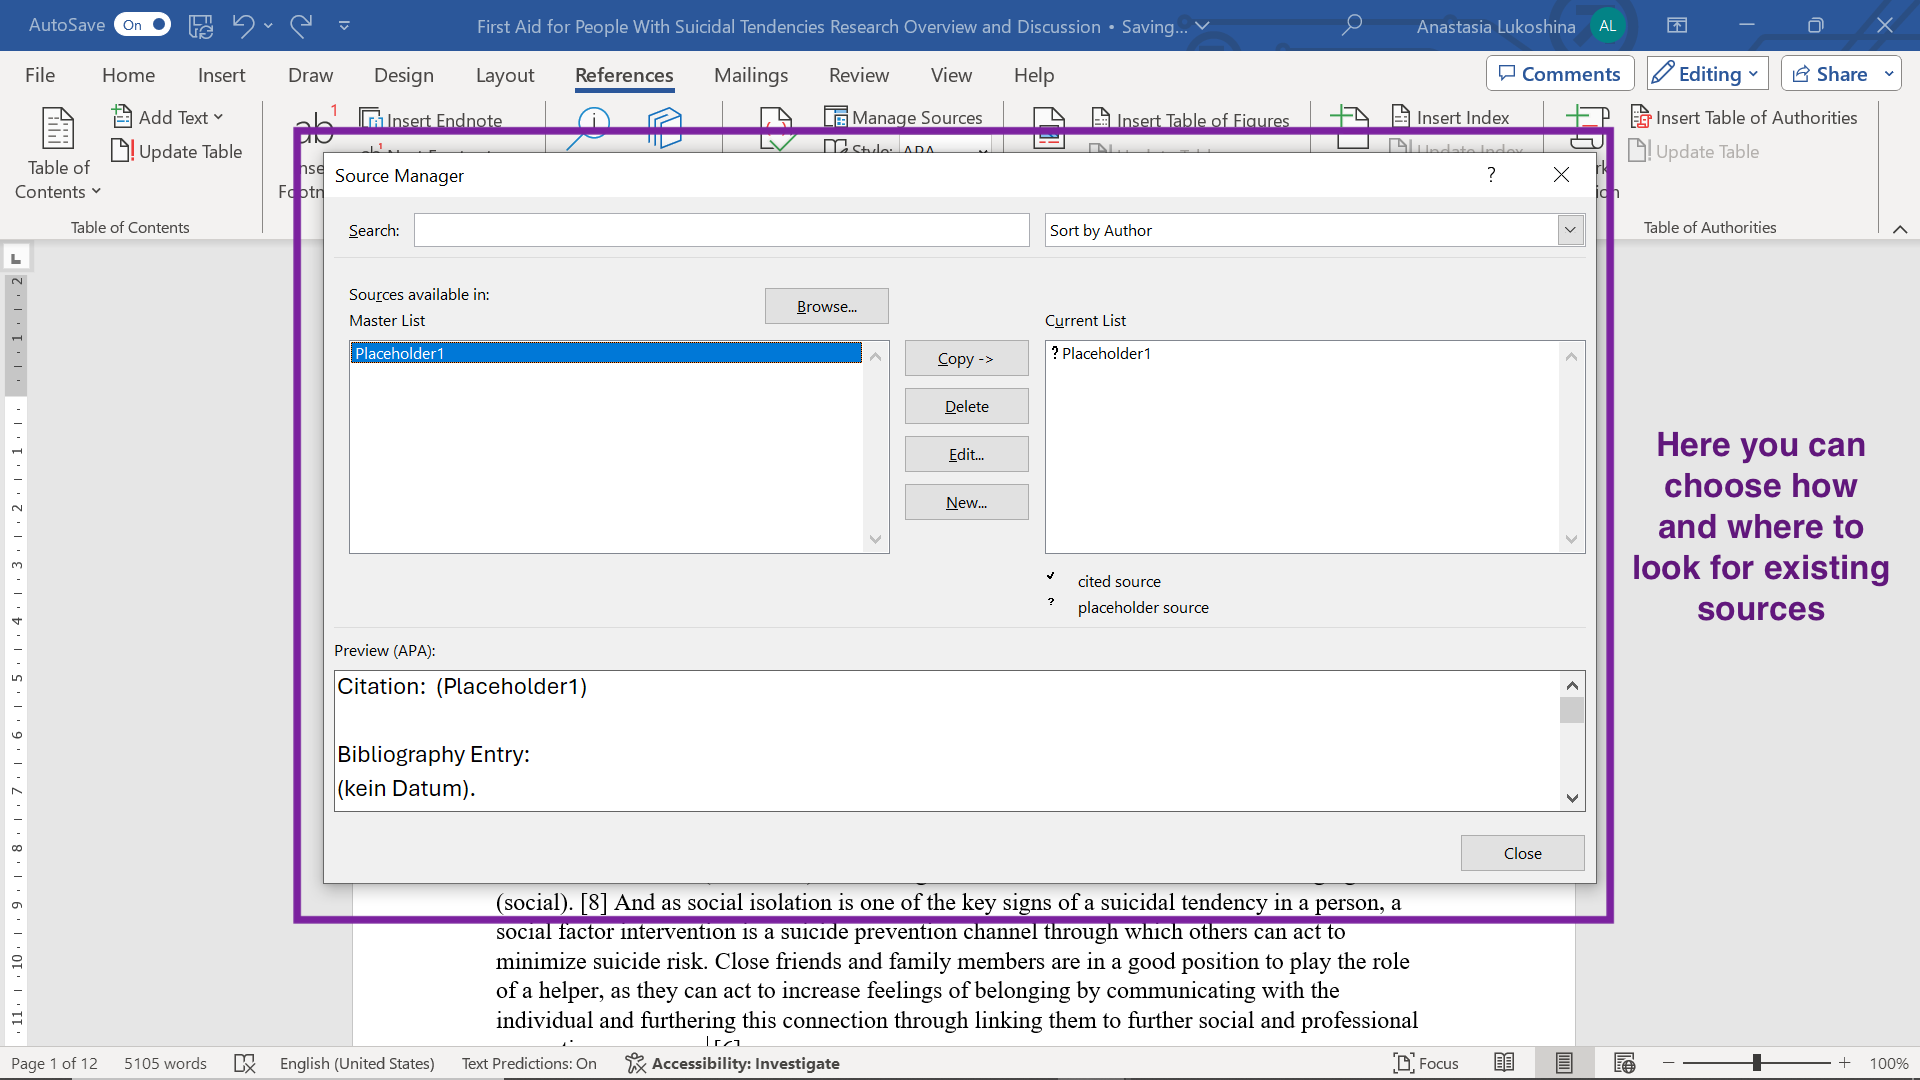
In the “Source Manager” dialog box, you’ll see two lists:
- Current List: Displays sources that are cited in the current document.
- Master List: Contains all sources you’ve ever cited in any document, as long as you’ve used the same computer. This is a cumulative list that can be a valuable resource for accessing previously used sources.
4. Finding a Specific Source
- Sorting: You can sort your sources by author, title, citation tag name, or year using the sorting box. This makes it easier to locate a specific source in a long list.
- Searching: If you remember a specific detail about the source, such as the author’s name or the title, you can use the Search box to quickly find it. Simply type in your search term, and the list will dynamically narrow down to match your query.
5. Using the Found Source
Once you’ve located the desired source, you can perform various actions:
- Edit: If you need to update any details of the source, you can select it and click the “Edit” button.
- Delete: If a source is no longer needed or was added by mistake, you can remove it from your list by selecting it and clicking the “Delete” button.
6. Use Again
If you want to cite the source in your current document, simply select it and click the “Copy” button to add it to your “Current List.” You can then insert the citation into your document as needed.
After getting to know the “Manage Sources” feature in Microsoft Word, you will be able to easily find and manage your sources, which makes the process of citing and referencing more streamlined and organized. This not only will save you time but also make sure that the added works are accurately cited, and the overall quality and credibility of your academic paper will level up.
Conclusion
Inserting citations and creating bibliographies in Word is a skill that can significantly improve the credibility and professionalism of your academic work. By following the simplesteps outlined in this guide, you can make sire that your document follows the appropriate citation style and format, making your writing more authoritative and well-researched. And who doesn’t want a professor looking at their paper and thinking how neatly organized it is? Proper citations really do make a good impression. Whether you’re adding new sources or managing existing ones, Word provides the tools you need to properly cite your references and present your information in a clear and organized manner.
FAQ
More from Citation Guides


Comments (0)
Welcome to A*Help comments!
We’re all about debate and discussion at A*Help.
We value the diverse opinions of users, so you may find points of view that you don’t agree with. And that’s cool. However, there are certain things we’re not OK with: attempts to manipulate our data in any way, for example, or the posting of discriminative, offensive, hateful, or disparaging material.